
I just wanted to post a DIY on how to make a kydex mag pouch. I did this one for an AK-74 mag, but it is essentially the same skill set to mold pistol holsters, and knife sheaths. This took me about 3 hours and cost a total of:
Kydex $3.36
Chicago Screws $1.26
Rivets $0.72
Total cost: $5.34
This is broken down into actual materials used and does not account for shipping expenses or tools needed to complete the project. If anyone has any questions feel free to PM or just drop a message in the post and I will try to respond. This is very picture intensive so I am posting it in a few posts. Here is where I get all my kydex and other holster making parts and tools from http://www.knifekits.com/vcom/index.php
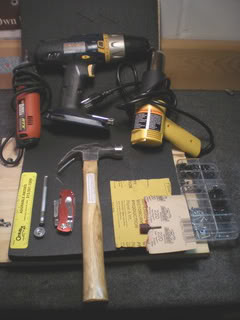
Basic tools that I have found are needed:
1. Hammer
2. Kydex (.08” thickness)
3. Heat gun
4. Electric drill & bit
5. Box cutter
6. Dremel
7. Assorted sand paper. I use 220 and 400 grit
8. A few nuts and bolts to align holes when drilling
9. Rivets (6 needed #8 size)
10. Rivet punch
11. Foam press
12. Pieces of 1 ½” X ½” wood for forming belt loops.
13. Need 4 Chicago screws
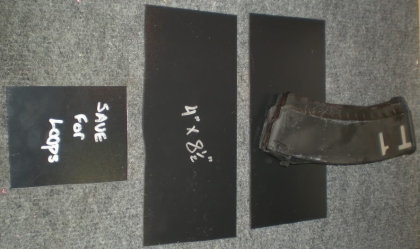
Start by cutting out two 4”X12” sheets of kydex. The sheets come in a 12”X48” sheet for around $10.00 so you can get quite a few projects out of one sheet. The cutting is done with the box cutter. It doesn’t have to cut all the way through, just enough to score it. From there you can just bend and snap it. Then I cut the excess down to 4”X8” and use the left over to make belt loops later Figure out how you want your magazine to lay on your hip

Place in oven on a cookie sheet --- 320* for 4-5 minuets
Make sure to clean the surface of any residue. (my first few experiments smell like garlic salt)
Once it comes out of the oven you have about 30 seconds in which you will have to work with the kydex. This part I don’t have pictures for. So I will try to be more detailed. 1-Take kydex out of oven. 2- Move to foam press. 3-Place one layer of kydex fairly centered in the press. 4-then place object to be molded on top of first layer. 5- This part is important to situate your mag how you want it to be molded on the kydex (that’s how it will look on your hip). 5- Place second layer of kydex on top, trying to keep the layers fairly squared up. It is OK if it is off by a little bit because you can fix it during the sanding process. 6-place top layer of foam on and place weight on press for 15 min. (I have found it easiest just to put a chair in front of the TV and sit on it for 15min that way I am not tempted to squirm around or get board)

After 15min this is what it should look like when it comes out of the press
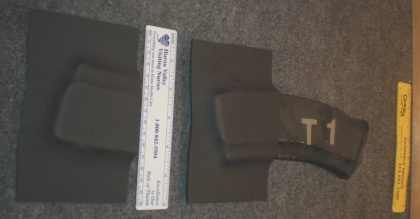
Cut down the sides with a box cutter I leave a little more excess than I think I will need because you can’t add on more kydex. Figure you probably want at least 1” for mounting belt loops

Start drilling. I use a few nuts and bolts in the first few holes so that the rest of the holes line up when you have the rivets in them I drill my holes ¼” in from the sides. I spaced my belt loop holes 2 1/2” apart and put another hole in the center to make it beefier.

I pound in the rivets with the hand punch. It is the cheapest way; it was something like $12.00 for a hand punch. When pounding it is better to hammer lightly. Let the weight of the hammer do most of the work in the arch of a normal hammer swing. The rivets are the biggest difference between professionally made holsters and a homemade number. I believe pro’s use a rivet press which applies equal presser on the rivet. When hand riveting you can see where the rivets were hit with unequal pressure. It Is not a big deal and as far as I can tell it does not affect the function of the holster.
Heat gun forming can be tricky. The mag will be very tight in the holster and you will basically have to reheat certain areas of the holster and mold them slightly for the mag to move freely in and out. This process can take some time and go slow. If you make small mistakes you can heat the area and throw it back in the foam press to try to remold and start over.
Notice when making an AK style holster you need to bevel out a small lip with a dremel so the mag catch can move in and out freely. Take the heat gun and slightly bow out the area that has been beveled so the mag inserts more naturally.
Once you have the holster to the tension your want it you need to bend the “tabs”.
Just take the heat gun and warm up the sides and press the tabs at an angle against any flat surface. After bending the tabs you might have to go back and do some more tensioning on the holster with the heat gun. You might also have to give the rivets a tap again with the hammer and punch.
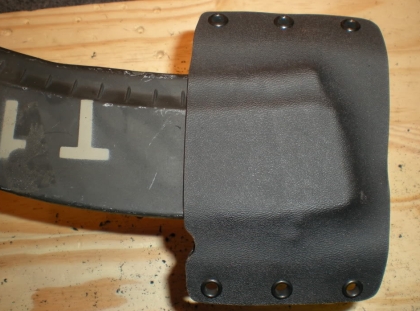
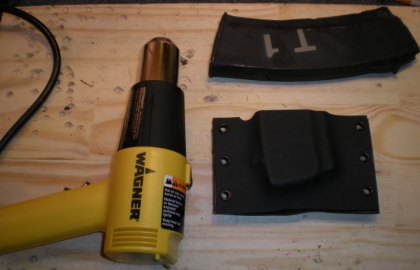
After you bend your tabs in, get the dremel out and form the holster to your liking. I just round the edges and try to fix any imperfections that I can. This is more or less what the mag pouch will end up looking like at the end of the process.

Now we just need belt loops and if you have made it this far those are fairly easy to make.

I make belt loops ¾” wide and use about 4” of material to make them.
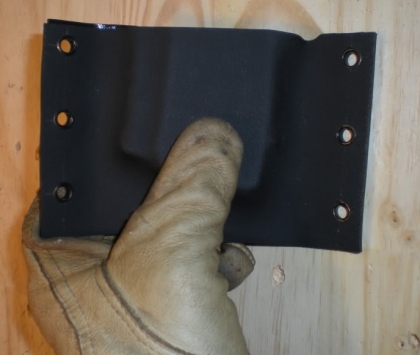
They are made by molding them around a 1 ½” X ½” piece of wood. This gives them a more squared off professional look. Below is a picture of me forming one of them. Use the heat gun to get the kydex moldable then a separate piece of wood to help keep the edges square.

You should have to hold it in this position for 1min or so to let it cool into place.

Here is both of the belt loops mounted. I just figure out where I want them in relation to my belt then mark them and drill the holes. After the holes are drilled just round off the edges with a dremel and you should be good to go.
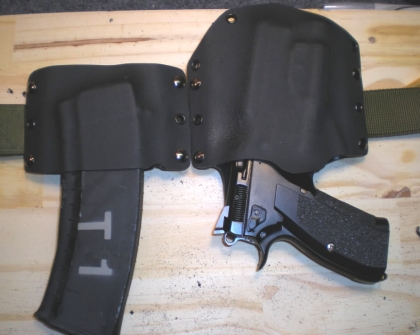
holster W/CZ-75 SP01 and finished mag pouch for AK-74 mag

(Origin from www.migunowners.org )
Kydex $3.36
Chicago Screws $1.26
Rivets $0.72
Total cost: $5.34
This is broken down into actual materials used and does not account for shipping expenses or tools needed to complete the project. If anyone has any questions feel free to PM or just drop a message in the post and I will try to respond. This is very picture intensive so I am posting it in a few posts. Here is where I get all my kydex and other holster making parts and tools from http://www.knifekits.com/vcom/index.php
Basic tools that I have found are needed:
1. Hammer
2. Kydex (.08” thickness)
3. Heat gun
4. Electric drill & bit
5. Box cutter
6. Dremel
7. Assorted sand paper. I use 220 and 400 grit
8. A few nuts and bolts to align holes when drilling
9. Rivets (6 needed #8 size)
10. Rivet punch
11. Foam press
12. Pieces of 1 ½” X ½” wood for forming belt loops.
13. Need 4 Chicago screws
Start by cutting out two 4”X12” sheets of kydex. The sheets come in a 12”X48” sheet for around $10.00 so you can get quite a few projects out of one sheet. The cutting is done with the box cutter. It doesn’t have to cut all the way through, just enough to score it. From there you can just bend and snap it. Then I cut the excess down to 4”X8” and use the left over to make belt loops later Figure out how you want your magazine to lay on your hip
Place in oven on a cookie sheet --- 320* for 4-5 minuets
Make sure to clean the surface of any residue. (my first few experiments smell like garlic salt)
Once it comes out of the oven you have about 30 seconds in which you will have to work with the kydex. This part I don’t have pictures for. So I will try to be more detailed. 1-Take kydex out of oven. 2- Move to foam press. 3-Place one layer of kydex fairly centered in the press. 4-then place object to be molded on top of first layer. 5- This part is important to situate your mag how you want it to be molded on the kydex (that’s how it will look on your hip). 5- Place second layer of kydex on top, trying to keep the layers fairly squared up. It is OK if it is off by a little bit because you can fix it during the sanding process. 6-place top layer of foam on and place weight on press for 15 min. (I have found it easiest just to put a chair in front of the TV and sit on it for 15min that way I am not tempted to squirm around or get board)
After 15min this is what it should look like when it comes out of the press
Cut down the sides with a box cutter I leave a little more excess than I think I will need because you can’t add on more kydex. Figure you probably want at least 1” for mounting belt loops
Start drilling. I use a few nuts and bolts in the first few holes so that the rest of the holes line up when you have the rivets in them I drill my holes ¼” in from the sides. I spaced my belt loop holes 2 1/2” apart and put another hole in the center to make it beefier.
I pound in the rivets with the hand punch. It is the cheapest way; it was something like $12.00 for a hand punch. When pounding it is better to hammer lightly. Let the weight of the hammer do most of the work in the arch of a normal hammer swing. The rivets are the biggest difference between professionally made holsters and a homemade number. I believe pro’s use a rivet press which applies equal presser on the rivet. When hand riveting you can see where the rivets were hit with unequal pressure. It Is not a big deal and as far as I can tell it does not affect the function of the holster.
Heat gun forming can be tricky. The mag will be very tight in the holster and you will basically have to reheat certain areas of the holster and mold them slightly for the mag to move freely in and out. This process can take some time and go slow. If you make small mistakes you can heat the area and throw it back in the foam press to try to remold and start over.
Notice when making an AK style holster you need to bevel out a small lip with a dremel so the mag catch can move in and out freely. Take the heat gun and slightly bow out the area that has been beveled so the mag inserts more naturally.
Once you have the holster to the tension your want it you need to bend the “tabs”.
Just take the heat gun and warm up the sides and press the tabs at an angle against any flat surface. After bending the tabs you might have to go back and do some more tensioning on the holster with the heat gun. You might also have to give the rivets a tap again with the hammer and punch.
After you bend your tabs in, get the dremel out and form the holster to your liking. I just round the edges and try to fix any imperfections that I can. This is more or less what the mag pouch will end up looking like at the end of the process.
Now we just need belt loops and if you have made it this far those are fairly easy to make.
I make belt loops ¾” wide and use about 4” of material to make them.
They are made by molding them around a 1 ½” X ½” piece of wood. This gives them a more squared off professional look. Below is a picture of me forming one of them. Use the heat gun to get the kydex moldable then a separate piece of wood to help keep the edges square.
You should have to hold it in this position for 1min or so to let it cool into place.
Here is both of the belt loops mounted. I just figure out where I want them in relation to my belt then mark them and drill the holes. After the holes are drilled just round off the edges with a dremel and you should be good to go.
holster W/CZ-75 SP01 and finished mag pouch for AK-74 mag
(Origin from www.migunowners.org )
Keine Kommentare:
Kommentar veröffentlichen